Opening the MUSCAT Cryostat
To open the MUSCAT cryostat it should be first mounted on the work frame with the clam plate closed and secured in place, this allows the vacuum can and radiation shields to be lowered.
Before opening the cryostat, the operator should be certain that all the stages and internal components of MUSCAT have thermalised to room temperature.
Mounting MUSCAT on the Work Frame
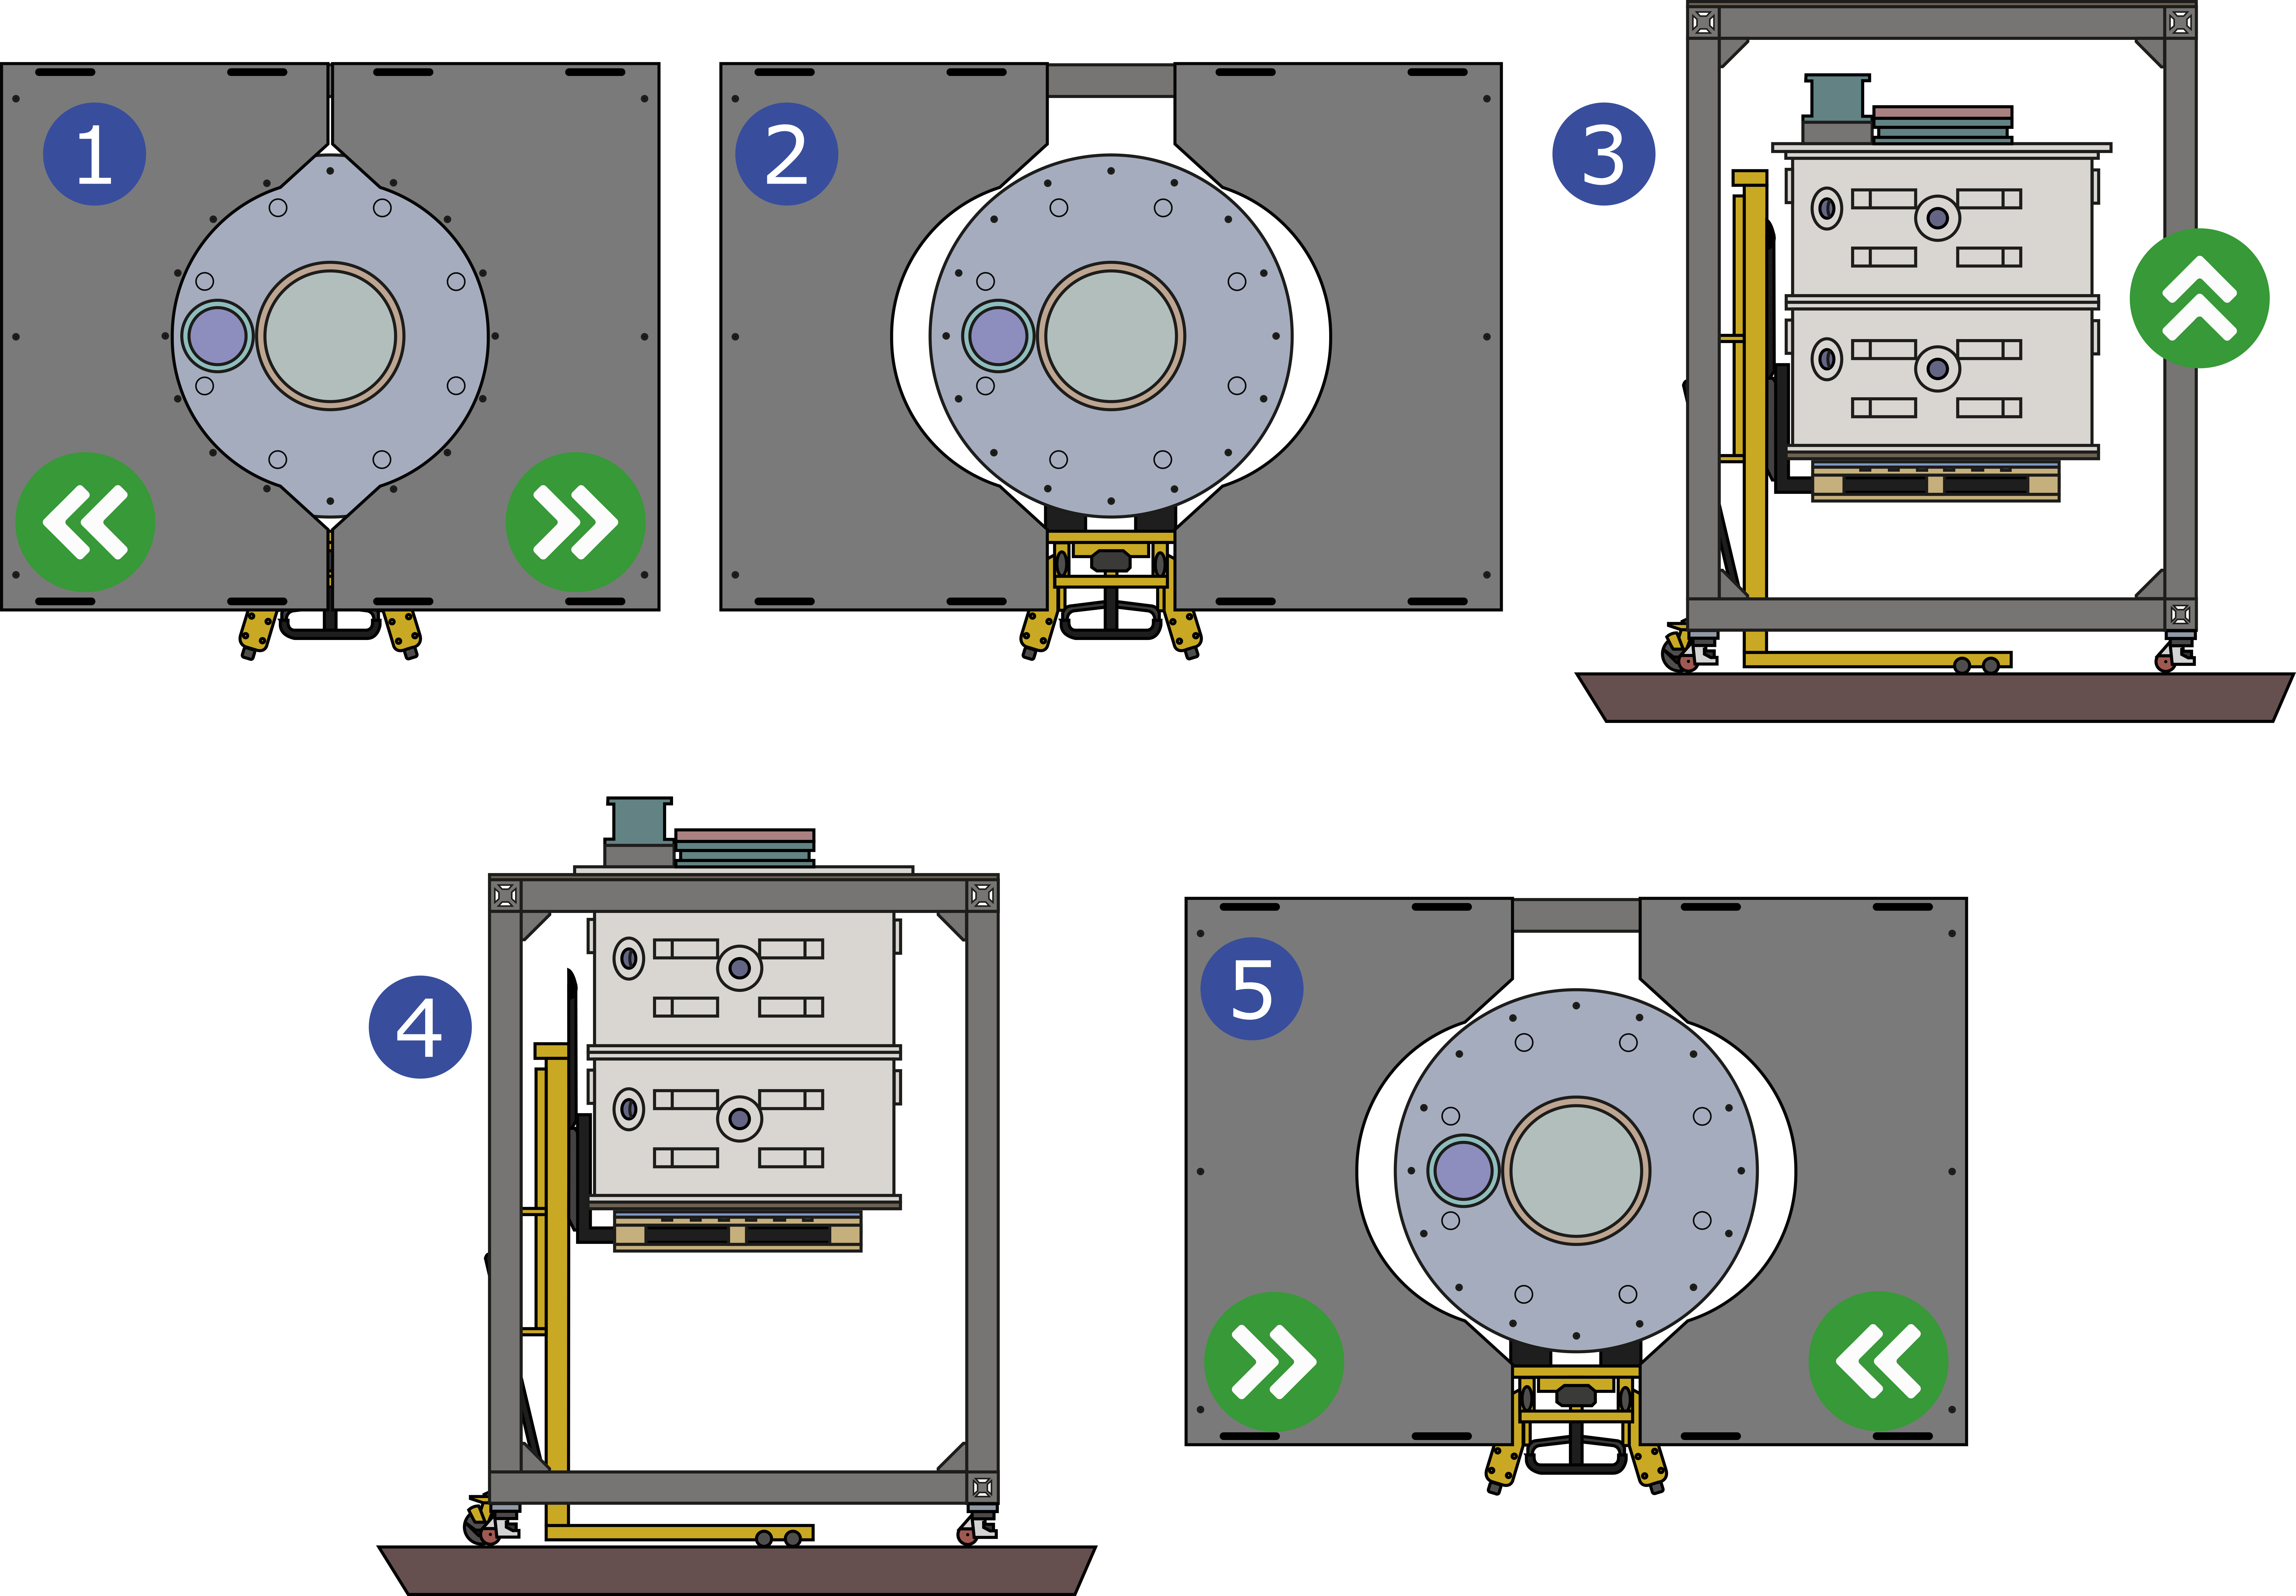
- With MUSCAT placed centrally under the work frame, remove the bolts on the long edge of each clam plate and loosen the bolts in the slots on the short edges.
- Slowly slide the clam plates outwards in small alternation steps as to avoid the work frame tipping.
- By rotating the gear-shaped dial on each wheel of the work frame, raise the rubber foot allowing the wheel to move freely on the floor.
- Raise the MUSCAT cryostat through the opening between the two clam plates and move the work frame to ensure the cryostat is centred with respect to the work frame.
- Slide the clam plates closed in small steps and alternating plates to ensure the work frame does not tip. Move the frame as needed to ensure the MUSCAT cryostat is centred.
- Tighten the bolts in the short edges of the clam plates and reinstall and tighten the bolts in the long edges.
- Rotate the work frame to align the outer-most bolt holes in the top plate of MUSCAT with the corresponding holes in the clam plates.
- Lower the MUSCAT cryostat so the top plate is resting on the clam plates.
- Instal and tighten bolts through the outer-most holes in the top plate of the MUSCAT cryostat to secure the cryostat to the work frame.
- Rotate the gear-shaped dial on each wheel to lower the rubber foot and raise the wheel slightly off the floor.

Removing the Vacuum Can
- Using lifting equipment, place a pallet under the MUSCAT cryostat in contact with the underside of the vacuum can. Ensure the lifting mechanism of the equipment is locked.
- Loosen all the nuts that secure the vacuum can to the top plate by half a turn.
- Remove and store the KF-40 vacuum blank and clamp from the vacuum port of the MUSCAT cryostat.
- Slowly vent the vacuum by opening the valve on the vacuum port. This process should take approximately 10 minutes. The valve should be opened only enough to allow the sound of air filling the cryostat to be audible. While venting the vacuum, continually check that the vacuum can is supported by the pallet and lifting equipment.
Venting the vacuum to quickly will cause permanent damage to the filters and other components within MUSCAT.
- Once the vacuum is vented and the vacuum valve is fully open, remove and store the nuts and washers that secured the vacuum can to the top plate.
- Slowly lower the vacuum can until the top of the vacuum can is lower than the bottom of the 50-Kelvin shield. While lowering the vacuum can it is important to constantly check that it will not catch or scratch the 50-Kelvin shield.

Removing the 50-Kelvin Shield
- Using lifting equipment, place a pallet under the bottom of the 50-Kelvin shield to support the field.
- Remove and store the bolts and washers from the perimeter of the 50-Kelvin shield that secure the shield to the 50-Kelvin plate.
- Unplug the lid diode connector close to the interface between the 50-Kelvin shield and plate.
- Using the lifting equipment, carefully lower the 50-Kelvin shield until it is clear of the 4-Kelvin shield. Ensure that it does not catch or scratch the 4-Kelvin shield.

Removing the 4-Kelvin Shield
- Using lifting equipment, place a pallet under the bottom of the 4-Kelvin shield to support the field.
- Remove and store the bolts and washers from the perimeter of the 4-Kelvin shield that secure the shield to the 4-Kelvin plate. Most of these bolts are pass through the shield and are tightened into tapped holes in the 4-Kelvin plate however two pass through the plate in the opposite direction and are tightened into nuts in the 4-Kelvin shield, these two bolts should be removed last.
- Unplug the lid diode connector close to the interface between the 4-Kelvin shield and plate.
- Using the lifting equipment, carefully lower the 4-Kelvin shield until it is clear of the 40Kelvin shield. Ensure that it does not catch or scratch the 450-mK shield.

Removing the 450-mK Shield
This step requires at least three people. Two to support and lower the shield, and one to undo the bolts.
- Unplug the 450-mK lid RTD (temperature sensor) at the interface between the 450-mK shield and plate.
- Remove and store all the bolts and washers except the two in the marked positions (see annotations of shield).
- With two people supporting the shield, remove the two remaining bolts and washers.
- Carefully lower the shield. The shield will clear the contents if lowered in a straight line downwards. Instead it need to be tilted to allow it to clear the detector modules and RF cabling on one side and the mirror support on the other side (this takes a bit of practice). Take care not to catch or damage tubes of the miniature dilution refrigerator, these contain the He4/He3 mix of the dilutor and are at very high pressure(approximately 70 Bar, 1000 PSI).
Storing the Vacuum Can and Shields
The shield should not be stacked or nested inside each other or inside the vacuum can. Doing so means it is extremely likely the low-emissivity lining on the walls of the shields and inner wall of the vacuum can will be damaged. Can should be taken to protect the neoprene o-ring in the vacuum can from becoming dirty.